Flutter Bloc: More Efficient and Cleaner App Development
Introduction
Sooner or later, when a Flutter app reaches a certain size, you think about how and where to program all the logic. Flutter already offers several solutions for this out of the box. There’s, for example, the standard StatefulWidget with its setState method or an InheritedWidget to use data in different parts of the app.
However, since I’m a fan of separating logic from the UI, I use Flutter Bloc in most of my apps. I struggled a bit when I started with Flutter Bloc and know how complicated Flutter Bloc can be. Therefore, let’s first look at how Flutter Bloc works.
If you’re alternatively interested in Flutter Riverpod, then feel free to check out my detailed blog post about it. There’s also a comparison of Bloc and Riverpod. Feel free to check that out too.
The article was created together with my YouTube video. If videos help you learn better, feel free to check it out.
How Does Bloc Work?
Flutter Bloc separates logic and UI through a controller (Bloc) and states (State). Controllers manage state changes based on events (Events) that are triggered by the UI.
If you’ve ever been on the official website, you’ve probably seen this figure:
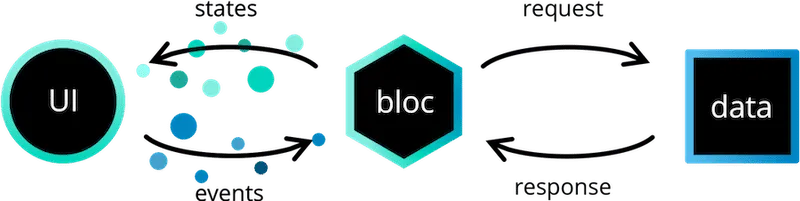
The figure shows the architecture of an app created with the Flutter Bloc architecture. There are three areas: the user interface (UI), Bloc, and the data sources.
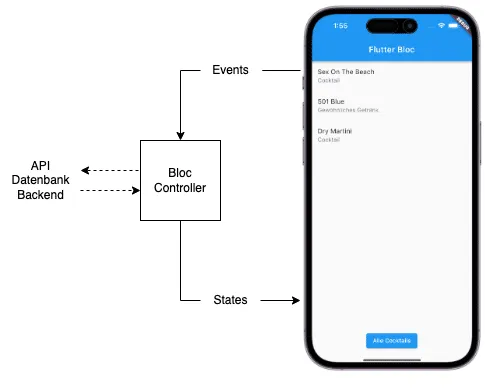
Today, however, we’ll only focus on the first two areas, the UI and Bloc. The UI is the visible part of the app, containing screens and interactions. What’s added now are the three parts that belong to Bloc: the events, the states, and the Bloc controller.
Event
Events are triggers in the app. This can be both a button being pressed and a timer that triggers an event every 10 seconds, or you’ve scrolled to the end of a list. Anything that has to do with interaction in the app is an event.
State
Then there are states that determine the current status of the app. For example, when the app is processing or downloading something in the background, it has the status “Loading”. When the app has completed the process, this status changes to “Success”.
However, if an error occurs, the status changes to “Error”. In this way, the current status of the app can be determined at any time to signal to the user what’s currently happening in the app.
Controller
The controller determines what should happen when an event occurs and what status the app should have. It’s also responsible for making HTTP requests and processing data further. This is where the actual logic of the app is programmed.
The Bloc Principle
Now looking at the different parts, Flutter Bloc always follows the same principle. When a button is pressed in the app, an event is triggered. This event is recognized by the controller and processed further.
The controller sets the app’s status to “Loading”, which allows a loading screen to be displayed in the app. Then an HTTP request is made by the controller. After the request was successful, the controller sets the status to “Success” and passes the data to the UI and displays a confirmation message.
Let’s look at this in an example.
Example for Flutter Bloc
Here is the source code to try out.
In this example, a list of cocktails should be loaded when the button is pressed.
Since Flutter Bloc doesn’t officially belong to Flutter, we first need to include the package. We do this with the following command.
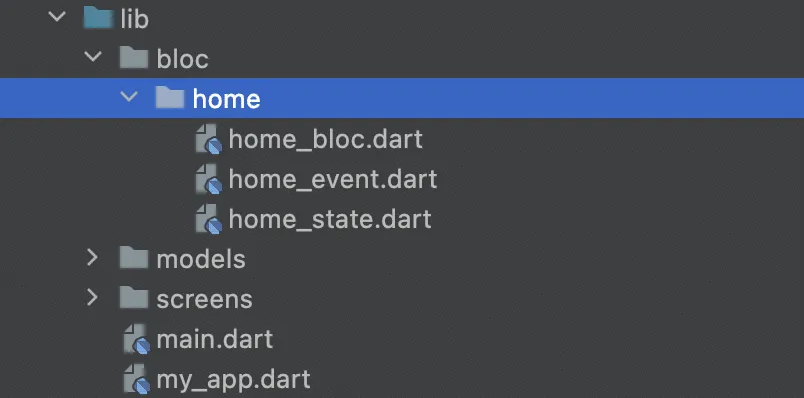
flutter pub add flutter_blocFirst, we create a folder for all our Bloc files and another folder for our home Bloc. By the way, it’s recommended to create at least one Bloc for each screen in the app. The Flutter Bloc plugin for Android Studio proves very helpful here. It automatically generates all three files we need: one for events, one for states, and one for the controller.
Let’s start with events and states. For our button, we only need one event. For the states, we define one each for “Loading”, “Success”, and “Failure”. In the Success state, we additionally implement a variable for the cocktail data that will be displayed in the UI.
// home_event.dart
part of 'home_bloc.dart';

@immutable
abstract class HomeEvent {}

class HomeFetchedCocktails extends HomeEvent {}
// home_state.dart
part of 'home_bloc.dart';
@immutable
abstract class HomeState {}
class HomeInitial extends HomeState {}
class HomeInProgressState extends HomeState {}
class HomeSuccessState extends HomeState {
final List<CocktailModel> cocktails;
HomeSuccessState(this.cocktails);
}
class HomeFailureState extends HomeState {}The Controller That Manages Everything
The only thing missing is the controller. Here we first determine which event should be recognized. Then we set our states.
One at the beginning that will later display our loading screen, one if an error occurs, and one after completing the HTTP request. With Success, we also pass the cocktails.
// home_bloc.dart
import 'dart:async';
import 'package:bloc/bloc.dart';
import 'package:meta/meta.dart';

part 'home_event.dart';
part 'home_state.dart';

class HomeBloc extends Bloc<HomeEvent, HomeState> {
  HomeBloc() : super(HomeInitial()) {
    on<HomeEvent>((event, emit) async {
      if (event is HomeFetchedCocktails) {
        // Set status to 'loading'
        emit(HomeInProgressState());

        try {
          await Future.delayed(const Duration(seconds: 3));
          List<CocktailModel> cocktails = exampleCocktails;

          // Set status to 'success' and pass data
          emit(HomeSuccessState(cocktails));
        } catch (error) {
          // Set status to 'error'
          emit(HomeFailureState());
        }
      }
    });
  }
}
For simplification, the HTTP request in this example is just a constant with a 3-second delay. But you can imagine communication with an API at this point.
The logic is in place. Now let’s look at what still needs to be done in the UI.
To do this, let’s first go back to our home screen and create a HomeBloc variable. This is initialized in the initState function. At the same time, we also need to close the Bloc stream when we no longer need it.
To do this, we add a call to homeBloc.close() in the dispose function.
late HomeBloc _homeBloc;

@override
void initState() {
  _homeBloc = HomeBloc();
  super.initState();
}

@override
void dispose() {
  _homeBloc.close();
  super.dispose();
}
For our list, we now need a BlocBuilder. This widget, specially designed for the Bloc pattern, detects changes in state and can react to them. In the example, we see that when the status is set to “inProgress”, a CircularProgressIndicator is displayed.
With a “success” status, the list of cocktails is then displayed. Note here that the cocktails are stored as a variable in the State object.
BlocBuilder<HomeBloc, HomeState>(
  bloc: _homeBloc,
  builder: (context, state) {
    if (state is HomeInProgressState) {
      return const Expanded(
        child: Center(child: CircularProgressIndicator())
      );
    }
    if (state is HomeSuccessState) {
      return Column(
        children: List.generate(
          state.cocktails.length,
          (index) {
            CocktailModel cocktail = state.cocktails[index];
            return ListTile(
              title: Text(cocktail.strDrink.toString()),
              subtitle: Text(cocktail.strCategory.toString()),
            );
          },
        ),
      );
    }
    return Container();
  },
),
So we’ve programmed everything and our list now works according to the Flutter Bloc principle.
Bloc Widgets
Besides BlocBuilder, there are several other helpful Bloc widgets. These widgets help you interact with Blocs in your Flutter app.
Below you’ll find a detailed description and code examples for each of these widgets.
How Does a BlocBuilder Widget Work?
The BlocBuilder is a widget that detects changes in the Bloc state and reacts to them. It builds the UI based on the current state of the Bloc. The buildWhen parameter can be used to control when the UI is rebuilt. The states can be used for comparison.
BlocBuilder<HomeBloc, HomeState>(
  buildWhen: (previous, current) => previous != current,
  builder: (context, state) {
    if (state is HomeInProgressState) {
      return CircularProgressIndicator();
    }
    if (state is HomeSuccessState) {
      return Text('Loading successful: ${state.cocktails.length} cocktails');
    }
    return Text('Welcome!');
  },
)
How Does a BlocProvider Widget Work?
BlocProvider provides a Bloc instance for the entire widget tree. It facilitates access to the Bloc in child widgets.
BlocProvider(
  create: (context) => HomeBloc(),
  child: HomeScreen(),
)
How Does a BlocListener Widget Work?
The BlocListener reacts to state changes in the Bloc without re-rendering the UI. It’s suitable for actions like displaying snackbars or navigating. The listenWhen parameter can be used to control when the listener function is called.
BlocListener<HomeBloc, HomeState>(
  listenWhen: (previous, current) => current is HomeFailureState,
  listener: (context, state) {
    if (state is HomeFailureState) {
      ScaffoldMessenger.of(context).showSnackBar(
        SnackBar(content: Text('Loading failed')),
      );
    }
  },
  child: HomeScreen(),
)
How Does a BlocConsumer Widget Work?
BlocConsumer combines the functionality of BlocBuilder and BlocListener. It offers both the ability to react to state changes and to update the UI based on the state. The buildWhen and listenWhen parameters can be used to control when the builder or listener is active.
BlocConsumer<HomeBloc, HomeState>(
  listenWhen: (previous, current) => current is HomeSuccessState,
  listener: (context, state) {
    if (state is HomeSuccessState) {
      ScaffoldMessenger.of(context).showSnackBar(
        SnackBar(content: Text('Data loaded successfully')),
      );
    }
  },
  buildWhen: (previous, current) => previous != current
  builder: (context, state) {
    if (state is HomeInProgressState) {
      return CircularProgressIndicator();
    } else if (state is HomeSuccessState) {
      return ListView.builder(
        itemCount: state.cocktails.length,
        itemBuilder: (context, index) {
          return ListTile(
            title: Text(state.cocktails[index].strDrink),
          );
        },
      );
    } else {
      return Text('Please press the button to load.');
    }
  },
)
Advantages
- Separation of logic and UI
- Organized code, especially for larger projects
- Easier implementation of additional features
Disadvantages
- A lot of code even with little logic
- More complicated tests
- Not easy to get started with and somewhat complex at the beginning for some.
Conclusion
That was my little insight into the world of Flutter Bloc. I hope you learned something and could take something away. Feel free to write in the comments if you have any questions or if you have other topics that I should cover. I’m still editing a video on the topic, so stay tuned.
Anyone who prefers to watch all this in video format can check out my YouTube channel. I’ve uploaded a short 5-minute video about Bloc there.
Subscribe to Newsletter
Get updates on new blog posts, tutorials and tips about Flutter, Laravel and more.